What To Do When Your Car Won’t Start
You turn the key, but your car won’t budge. A dead battery is often the villain in this frustrating scenario. This guide will walk you through simple fixes to get back on the road.
Inspecting the fuel filter and pump, testing the starter motor, and checking for a dead battery are essential steps to troubleshoot a car that won’t start. Read on to learn more about diagnosing and addressing common issues with starting your vehicle.
1. Checking for a dead battery
Check the dashboard lights and headlights to determine if a dead battery is why your car is not starting. It could indicate a weak or dead battery if it is dim or doesn’t turn on.
Use a multimeter to test the battery voltage; ideally, it should be around 12.6 volts when fully charged. Also, look for any signs of corrosion on the battery terminals, as this can prevent proper electrical connection and lead to starting issues.
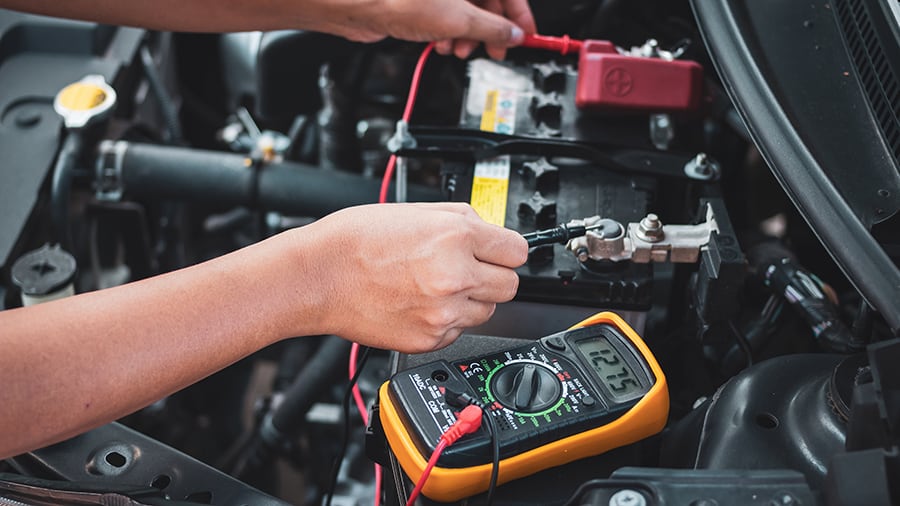
If you suspect that your car’s failure to start might be due to a dead battery, check for these indicators: dim dashboard lights and headlights. This could mean your vehicle’s battery is low or drained completely.
2. Inspecting the alternator
Inspect the alternator when troubleshooting a car that won’t start. A faulty alternator can lead to battery issues, causing the vehicle not to start. Look for signs of a defective alternator, such as dimming headlights or dashboard lights flickering while trying to start the car.
Use a multimeter to test the voltage output of the alternator. Also, check for loose connections or worn-out belts in the alternator system. Addressing problems with the alternator can help ensure it functions correctly and not contribute to the car’s starting issue.
3. Testing the starter motor
When looking into the functionality of your car’s starter motor, it’s crucial to assess its condition thoroughly. The starter motor is responsible for initiating the engine’s operation by cranking it, and any issues can impede the starting process.
Begin by visually inspecting the starter motor for any signs of physical damage or corrosion, which can hinder its performance. Then, utilize a multimeter to check the electrical resistance of the starter motor; a high resistance reading may indicate an impending failure.
Additionally, ensure that all connections to the starter motor are secure and free from corrosion or damage, as this can impact its proper functioning.
4. Checking the ignition switch
After testing the starter motor, another crucial step in troubleshooting a car that won’t start is checking the ignition switch. A faulty or worn-out ignition switch can prevent the electrical system from engaging, leading to a no-start condition.
When the ignition switch fails, it can disrupt the flow of electricity to critical components such as the fuel pump and starter motor, causing the car not to start.
Inspecting and testing the ignition switch for proper functionality is essential when diagnosing a car that won’t start. Ignition issues are often indicated by symptoms like difficulty turning the key in the ignition, intermittent starting problems, or no response when turning the key.
5. Examining spark plugs
Inspect spark plugs for wear, fouling, or damage. Look for signs of a black sooty appearance or oil fouling that could indicate engine issues. Check for corrosion on the terminals and ensure proper gap spacing to maintain optimal performance.
Replace worn or faulty spark plugs to improve ignition efficiency. A well-maintained spark plug is crucial for starting the engine and ensuring smooth operation. Regularly checking and replacing spark plugs can prevent problems from occurring and maintain overall vehicle performance.
6. Check the ignition coil
- Visual Inspection: Start by visually inspecting the ignition coil for any signs of physical damage, such as cracks, corrosion, or melted insulation. Ensure that all connections to the coil are secure and free from corrosion.
- Check Resistance: Disconnect the electrical connectors from the ignition coil using a multimeter set to measure resistance (ohms). Then, measure the resistance between the positive and negative terminals of the coil. Refer to your vehicle’s service manual for the specific resistance values, which can vary depending on the coil type.
- Test Primary and Secondary Circuits: Ignition coils typically have primary and secondary circuits. Measure the resistance between the positive terminal (connected to the ignition switch) and the coil’s primary terminal. Then, measure the resistance between the coil’s primary and high-tension terminals (connected to the spark plug). Again, consult your vehicle’s manual for the correct resistance values.
- Perform Spark Test: If the resistance readings are within specifications, you can perform a spark test to check if the coil is generating a spark properly. Remove one of the spark plug wires from the spark plug and insert a spare spark plug into the wire. Ground the spark plug against the engine block and crank the engine. Look for a strong, consistent spark at the spark plug gap. If there’s no spark or it’s weak and intermittent, the ignition coil may be faulty.
If you determine that the ignition coil is faulty, here’s how to fix it:
- Replacement: If the ignition coil fails tests or shows signs of physical damage, it must be replaced. Ensure you purchase a compatible replacement coil for your vehicle’s make, model, and engine type.
- Installation: Follow the manufacturer’s instructions for installing the new ignition coil. Ensure that all electrical connections are secure and properly tightened.
- Test: After installing the new ignition coil, repeat the same tests to verify it works correctly. Check for proper resistance readings and perform a spark test to confirm that the coil generates a spark reliably.
- Address Underlying Issues: If the ignition coil fails due to other underlying issues, such as a faulty ignition module, wiring problems, or a malfunctioning sensor, address those issues to prevent future problems.
7. Check the points (On old cars only)
Important: Make sure your ignition is turned off first.
- Locate the Points: Points are typically found inside the distributor, usually mounted on the engine block. You may need to refer to your car’s manual or consult a mechanic to locate them accurately.
- Visual Inspection: Inspect the points for wear, corrosion, or damage. Look for burnt or pitted contact surfaces, which indicate that the points need replacement.
- Check Point Gap: Using a feeler gauge, measure the gap between the points. Refer to your car’s manual for the correct gap specification. If the gap is incorrect, it can affect the ignition timing and engine performance.
- Test Continuity: Use a multimeter to test for continuity across the points with the ignition off. There should be continuity when the points are closed and no continuity when they are open. If there’s continuity when the points are supposed to be open, it indicates a fault.
- Inspect Condenser: The condenser is often located near the points. Inspect it for any signs of damage or leakage. A faulty condenser can cause points to fail prematurely.
If you find any issues during these checks, here’s how to correct them:
- Replace Points: If the points show signs of wear or have an incorrect gap, replace them with a new set. Follow the manufacturer’s recommendations for the replacement procedure and ensure the new points are correctly gapped.
- Replace Condenser: If the condenser is faulty, replace it with a new one. Again, follow the manufacturer’s recommendations for the replacement procedure.
- Adjust Point Gap: If the point gap is incorrect, adjust it to the correct specification using a feeler gauge. Be precise, as the correct gap is crucial for proper ignition timing.
- Check Wiring: Ensure that the wiring connected to the points is in good condition and properly connected. Loose or damaged wiring can cause intermittent issues with the ignition system.
- Test Ignition System: After making any adjustments or replacements, test the ignition system to ensure the points function correctly. Start the engine and listen for smooth idling and acceleration.
8. Inspecting fuel filter and pump
Test the fuel pump by turning on the ignition. It could indicate a faulty pump if you don’t hear a buzzing sound from the fuel tank. Use a fuel pressure gauge to check for sufficient pressure in the system, ensuring proper fuel delivery to the engine.
Look for clogs or debris in the fuel filter that may obstruct fuel flow to the engine and replace it if necessary. Additionally, verify that there are no leaks in the fuel line, which can lead to pressure loss and hinder starting.
Dealing with a jammed steering lock
Inspecting the fuel filter and pump is crucial, but a jammed steering lock can prevent your car from starting. If you’re facing this issue, try turning the steering wheel left and right while gently jiggling the key in the ignition.
This might release the pressure on the steering column and allow you to start your vehicle without hassle.
If your car doesn’t start due to a jammed steering lock, avoid forcing or hitting the steering wheel, as it can damage internal components. Instead, remain patient and gently manipulate the key and steering wheel to resolve this problem.
When to Seek Professional Help
If you notice signs of a more severe issue, such as strange noises or smoke from the engine, it’s best to seek professional help. Additionally, if you cannot diagnose the problem after troubleshooting, it’s time to take your car to a mechanic.
Signs of a more serious issue
If the car doesn’t start without power and a functioning battery, it may indicate a more severe issue with the alternator or an electrical problem. Unusual noises during ignition attempts or clicking sounds without power could indicate a starter motor or electrical issues.
In addition, repeated stalling of the engine after starting may indicate fuel pump issues that require professional attention for diagnosis and repair.
In some cases, persistent engine trouble, despite addressing common causes such as the battery and fuel system, may necessitate professional help to diagnose potential mechanical failures like faulty ignition systems or malfunctioning fuel injectors.
Unable to diagnose the problem
If your car won’t start and you cannot diagnose the problem, you must consider seeking professional help. Signs of a more serious issue may include no noise or power when trying to start the car, indicating a potential electrical or wiring problem.
When faced with challenges in diagnosing the issue, roadside assistance can provide expert support and prevent further damage. Additionally, if your vehicle won’t start but has electrical power, it could indicate an alternator problem or loose/corroded connections that need immediate attention.